Using XLWT to Write Spreadsheets Without Excel
Long before I even started thinking about writing a blog covering the integration possibilities between Excel and Python, the folks at Simplistix were crafting some of the handiest Python modules around: xlrd, xlwt and xlutils.
Simplistix is no longer with us, but their page at http://www.simplistix.co.uk provides links to their GitHub repos. These fantastic modules enable Python to directly read and write an Excel .xls file without the need for Microsoft Excel. Not only can you insert numbers and text, but xlwt supports a multitude of formatting options. There’s even a great set of documentation and a Google group monitored by the maintainers. You can find out more about these modules at http://www.python-excel.org
Installation
For Python versions 2.6 and later, you can install xlwt with the pip
utility. Open a Windows command window and run pip install xlwt as
follows:
C:\> python --version
Python 3.7.3

C:> pip install xlwt
Collecting xlwt
Downloading https://files.pythonhosted.org/packages/...
lwt-1.3.0-py2.py3-none-any.whl (99kB)
Installing collected packages: xlwt
Successfully installed xlwt-1.3.0
Using xlwt
I’ve written a fair number of Python scripts that interface with Excel through the Windows COM interface, but for many tasks you don’t need to invoke Excel to operate on spreadsheet data. The Simplistix utilities provide an excellent way of interfacing with Excel spreadsheets for many routine jobs.
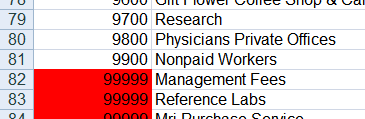
In my example below, I format a raw text file containing information on reference account categories for a hospital (based on data from data.gov):
09700RESEARCH
09800PHYSICIANS  PRIVATE OFFICES
09900NONPAID WORKERS
MANAGEMENT FEES
REFERENCE LABS
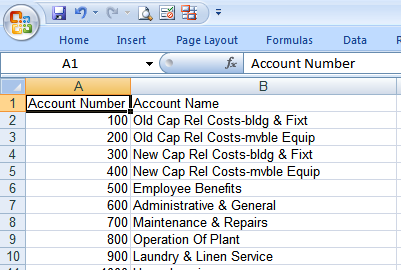
The raw data is smashed together, with the account number and category abutted without separation. Some of the data doesn’t even have an account number. Based on the input above, the goal is to produce Excel output like this:
To create this output, the script does the following:
- Separates the account number and name
- Assigns an account number of 99999 and sets the cell color to red for unnumbered accounts
- Converts the account name to a properly capitalized name
- Removes any extra spaces in the account name
- Writes the account number and name into two separate columns in the spreadsheet
- Formats the column width of each spreadsheet column based on the width of the widest data
Since there are no charts, pivot tables, or other fancy formatting needed, xlwt is perfect for the job. Here is the script that performs the conversion, available at xlwt_hospdata.py
import sys
import re
from xlwt import Workbook, easyxf


def doxl():
    '''Read raw account number and name strings, separate the data and
       write to an excel spreadsheet.  Properly capitalize the account
       names and mark cells with no account number as 99999 with red fill
       '''
    try:
        fp = open("hospdata.txt")
    except:
        print('Failed to open hospdata.txt')
        sys.exit(1)
    lines = fp.readlines()

    nameandnum = re.compile(r'(\d+)\s*(.*)\s*')
    wb = Workbook()
    wsraw = wb.add_sheet('Raw Data')
    ws = wb.add_sheet('Account List')
    ws.write(0, 0, 'Account Number')
    ws.write(0, 1, 'Account Name')
    ws.col(0).width = len('Account Number') * 256
    ws.col(1).width = max([len(line) for line in lines]) * 256
    r = 1

    for line in lines:
        wsraw.write(r, 0, line.strip())
        m = nameandnum.match(line)
        if m:
            ws.write(r, 0, int(m.group(1)))
            ws.write(r, 1, ' '.join([w.capitalize() for w in m.group(2).split()]))
        else:
            ws.write(r, 0, 99999, easyxf('pattern: pattern solid, fore_colour red;'))
            ws.write(r, 1, ' '.join([w.capitalize() for w in line.split()]))
        r += 1
    wb.save('accounts.xls')
    print('Wrote accounts.xls')


if __name__ == "__main__":
    doxl()
Before running this example, you must have xlwt installed as described in the Installation section above. Let’s look at the important bits in the script above.
The following lines 12-17:
    try:
        fp = open("hospdata.txt")
    except:
        print('Failed to open hospdata.txt')
        sys.exit(1)
    lines = fp.readlines()
attempt to open the file hospdata.txt. If successful, the file contents are read into “lines” as a list of strings. Next, line 19
nameandnum = re.compile(r'(\d+)\s*(.*)\s*')
creates a compiled regular expression used to parse each line. This regular expression extracts an account number and account name from the string. It’s assumed that the account numbers can only contain digits, and the account names cannot begin with a digit. The compiled regular expression is used later to attempt a match on each line in the input file.
The next section (lines 20-26) creates a new workbook with two worksheets:
wb = Workbook()
wsraw = wb.add_sheet('Raw Data')
ws = wb.add_sheet('Account List')
ws.write(0,0,'Account Number')
ws.write(0,1,'Account Name')
ws.col(0).width = len('Account Number') * 256
ws.col(1).width = max([len(line) for line in lines]) * 256
The two worksheets are named “Raw Data” and “Account List” and are used to store the unprocessed and processed data. The headings “Account Number” and “Account Name” are written to the first row of the Account List worksheet. To set the column width, the length of the longest string in each column is multiplied by 256 to calculate the setting. Referring to the documentation for xlwt, you’ll see that the column width setting is based on the width of the 0 character for the first font in the list, not the default font, so you may want to fine tune the calculation to make the column width setting slightly wider than the actual data.
The next section (lines 29 through 37) iterates over each line of the text file:
for line in lines:
    wsraw.write(r,0,line.strip())
    m = nameandnum.match(line)
    if m:
        ws.write(r, 0, int(m.group(1)))
        ws.write(r, 1, ' '.join([w.capitalize() for w in m.group(2).split()]))
    else:
        ws.write(r, 0, 99999, easyxf('pattern: pattern solid, fore_colour red;'))
        ws.write(r, 1, ' '.join([w.capitalize() for w in line.split()]))
The raw data is written to the Raw Data sheet, then the line is matched against the regular expression. If the match is successful, the number part is written to the first column, and the text is written to the second column. The following statement in line 35:
' '.join([w.capitalize() for w in m.group(2).split()])
splits account name information into individual words, capitalizes each word, then reassembles the string with a space between each word. If you wanted to insert the account name string as-is, you would simply replace the statement above with the following:
m.group(2)
If no match occurs, then the string might not contain an account number. The script assumes that the whole string contains the account name only and a dummy account number of 99999 is inserted. In addition, the cell background is changed to a red color to flag the text for quick visual scanning.
After all input lines are processed, the accounts.xls file is written and the following message is printed by the following lines:
wb.save('accounts.xls')
print('Wrote accounts.xls')
The completed accounts.xls spreadsheet looks like this, with account number and name split into two columns and with a reformatted account name string:
Prerequisites
Python (refer to http://www.python.org)
xlwt (refer to http://www.python-excel.org)
Source Files and Scripts
Source for the program and data text file are available at http://github.com/pythonexcels/xlwt
References
http://www.python-excel.org contains pointers to some older information available about working with Excel files in the Python programming language.
http://groups.google.com/group/python-excel is the Google group for questions on xlrd, xlwt, xlutils and general questions on interfacing to Excel with Python
Originally posted on September 10, 2009 / Updated November 1, 2022